Acorn Computers Limited, 4a Market HIll, Cambridge CB2 3NJ, England, Telephone 0223 312772. Telex 81383 Peetam G

Acorn Computers Limited, 4a Market HIll, Cambridge CB2 3NJ, England, Telephone 0223 312772. Telex 81383 Peetam G
ATOM COLOUR BOARD
CONTENTS
Page 1 .........................Introduction
Page 2 .........................Installation
Page 3 .....................Test & Operation
Page 4 & 5 ..............Circuit Description
Issue 1
3/82
INTRODUCTION
The Atom Colour Board has been designed to meet require- ments for Atom colour. Acorn have included in the Colour Board:
1. A 60 - 50 Mz converter 2. RGB and Sync outputs 3. Colour encoded signal to drive the Atom's onboard modulator.
The Colour Board produces two sets of four colours:
| 1. | Red | Green | Blue | Yellow |
| 2. | Buff | Cyan | Magenta | Orange |
One of the four colours is designated as the background colour -- one can then plot onto this in one of the other three colours.
The "plotted" colour is selected using the Atom's "Colour" command provided by the Floating Point ROM, and the sets are alternated by using:
The default (switchon) colour set is Red, Green, Blue and Yellow (with Green as the background in graphics modes).
 |
 |
1
INSTALLATION
Before installing the Atom Colour Board check visually that it is not damaged in any way. Undo the two screws which secure the bottom of the Atom.
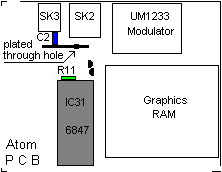
It is necesary to break the existing connection between the video amplifier and the U.H.F Modulator. This is done by gently pushing C2 towards the rear of the ATom board exposing a Plated Through Hole as illustrated in the dia- gram. Cut the copper track on side 2 as shown. Remove R11, a 3K9 resistor, from the main P.C.B.
Now remove the 6847 from the socket on the main P.C.B. and insert it in the socket on the Atom Colour Board (en- suring correct orientation) and then plug the entire assembly into the vacant 6847 socket on the main board. Now solder the flying lead from the Atom Colour Board to the positive end od C2. Secure the Colour Board by use of two double sided sticky pads, one on IC and the other on IC .
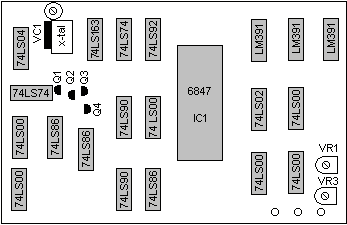
Before fixing the case bottom, the Colour board should be tested. Connect the U.H.F. Modulator output to a colour television and supply power to the Atom. Tune the television to channel 36 and press BREAK on the Atom; the ACorn Atom prompt should appear in green on a black background. If no colour is obtained it may be that the sub-carrier fre- quency is incorrect, adjust VC1 on the Colour Board with a small srewdriver, and check that the colour controls on the television set are correctly adjusted. If the picture will not synchronise, slight adjustment of VR1 may be necessary; if the prompt is not visibe but the picture is syncronised then adust VR3.
For above controls see diagram
2
TEST and OPERATION
The following program can be used to test your colour Atom:
 10 PRINT $ 12
20 FOR A = #20 TO #FF
30 PRINT $A
40 NEXT A
50 PRINT "PRESS shift TO TEST THE " ' "ALTERNA-
TIVE COLOUR SET"
60 DO UNTIL ?#B001<128
70 ?#b002 =".#B002:8
80 DO UNTIL ?#B002">128
90 GOTO 60
100 END
When the above program is run the entire Atom character set will be displayed at the top of the screen, pressing SHIFT will alternate between the character colour sets. This is done in line 60 (?#B002 = ?#B002:8)
3
CIRCUIT DESCRIPTION
The circuit breaks down into three basic areas as follows:
IC2 to IC8, Q1 to Q4 and associated components form the 50 Hz converter. The 3.579MHz CLK is taken from the main Atom P.C.B. via pin 33 of the socket. The Field Sync signal is taken from the 6847 IC and has 25 lines added at each end of the frame. During the addition of the 25 lines the 6847 clock is stopped. This extends the frame to effec- tively 213 lines of 64uS which gives a 50 Hz frame.
The luminance signal from the 6847 is added with the 25 line inserts on Q1/2 to give Y the combined luminance signal which, when the 6847 is stopped, consists of line sync for 25 lines.
The Y signl is fed to the comperators IC11 nd IC12. Adjust- ment of VR3 gives CSYNC at the output of IC15 pin 3. VR1 is adusted to give video information at IC12 pin 12.
The signals øA and øB and CHB are fed into IC9 and IC10 which are wired as treshold detectors to give the appropriate ABCD outputs dependant on the colour information given by øA and øB (see the table on the following page).
The signals ABCD are decoded to give the required RGB signals to drive the colour encoder or alternatively to drive the RGB monitor via the RGB outputs from Q5,6,7.
4
CIRCUIT DESCRIPTION (continued)
| The Decoding for R.G.B. is as follows: | |||||||
| FROM | TO | ||||||
| COLOUR | A | B | C | D | R | G | B |
| Green | L | L | L | L | L | H | L |
| Yellow | L | H | L | L | H | H | L |
| Blue | L | H | H | H | L | L | H |
| Red | H | H | L | H | H | L | L |
| Buff | L | H | L | H | H | H | H |
| Cyan | L | L | L | H | L | H | H |
| Magenta | H | H | H | H | H | L | H |
| Orange | H | H | L | L | H | L | L |
IC21 and XL1 generate a signal of 17.7344MHz which is counted in a four phase ring counter IC20 to give sub- carrier phases of - 90°, 0°, 90° and 180°. The required phases are selected by the RGB outputs and the relevant amplitudes are obtained through R49 to R56. The chrom- inence signals are added in the base of Q10. The luminence signal is generated by Q9. Two parts of IC22 generate the burst gate which is a pulse of 4uS after the negative going edge of HS (line sync), and HSis fed to a section of IC7 to generate the alternate line phase switching. The first section of IC17 is used to determine the polarity of CSYNC to be fed to the R.G.B. monitor output.
5